31 March 2011

Philosophy of Code

Programming in a business environment requires creating a product or service that is intended to produce a higher profit than cost. However, I believe that few programmers understand this or think about it on a daily basis. At the end of the day, we must be working towards making a profit.

I'll be the first to tell you that I'm not a business major. I'm not an economist. I love programming and was best friends with a keyboard in the third grade. I can write code like the dickens but I'm no Wizard of Business. However, throughout the past year working on Clone Wars Adventures I've had time (while my code is compiling) and inclination to reflect on the nature of programming in a business environment.

I've basically come to the conclusion that programming is a balance of three distinct yet intertwined facets: Developer Efficiency, Code Correctness and Performance. I call this the Philosophy of Code:

Performance - How quickly the code executes.
Developer Efficiency - How quickly developers are able to complete tasks.
Code Correctness - Adherence to best practices (avoiding global memory, avoiding macros, namespaces, templates, etc.).

These three aspects are not necessarily mutually exclusive. Every programming task that we work on has some balance of the above. However, when evaluating this philosophy from a business perspective, I've come to believe that the most important element of the triad is Developer Efficiency. Developing a Philosophy of Code that puts emphasis on Developer Efficiency will allow your programmers (and incidentally your entire development team) to work faster and smarter. It can also require less code to be written and fewer bugs.

Mutual Exclusivity
In some cases, an Efficiency-based Philosophy of Code will compromise the Performance and Code Correctness aspects. For instance, EverQuest II has a console-variable system. With one line of code in an implementation file I can add a semi-constant: a named value that can be changed by typing a slash-command into the chat window:
CV_FLOAT(max_radius, 30.0);
Presto. This is like saying float max_radius = 30.0; but I can also change it in real-time by typing "/max_radius 25" into the chat window. This typically is frowned upon from Code Correctness aspects for a few reasons:
  • It uses macros
  • It uses global memory
  • It causes code to execute before main()
If your Philosophy of Code leans towards Code Correctness, doing it the Right Way™ would entail at least:
  • Creating a manager object as a member of your application manager class
  • Writing explicit code to register a member of your class with the manager object
  • Writing explicit code to unregister that member when your class instance is destroyed
  • A lot more than one line of code
Leaning towards Code Correctness over Developer Efficiency in this case would require that your programmers spend more time writing code and compiling (since members are typically declared in header files) to accomplish a very simple task.

Compile Times
In some cases, Code Correctness philosophies can institute policies that work to the detriment of Developer Efficiency:
  • Extensive use of templates
  • Excessive class declarations
  • Lack of forward declarations
Excessive templatization typically means that header files are included in more places and more code is written in header files. When header files are changed, they require more of the code to be rebuilt. More code written in header files can also contribute to longer link times.

Time spent compiling and linking can't necessarily be taken at face value. As programmers wait for a rebuild they tend to do something else which probably takes longer than the rebuild. The shorter the rebuild time, the more likely the programmer is going to stay focused. From a Developer Efficiency perspective, it's in your best interest to keep compile times as low as possible.

Code Bloat
The less code that is required to perform a task, the more efficiently a developer can implement said code. I'll give another practical example from EverQuest II. I've previously mentioned a bit about how the designer data system works. Every server-side data file uses the same data format. As such, no special code is required to load each type of file. Weapons, quests, characters, everything is all defined by the same generic data description language. To load data from any data file uses a simple interface:
DataObject* pObject = DataLoader::Load("weapons/sword_of_awesomesauce");
if (pObject->IsA("Weapon"))
{
String name = pObject->GetField("Name").AsString();
}
Due to data object inheritance, pObject may actually be a Sword, but inherits from Weapon. The server's object model is further generified so that instantiating any object requires just providing the type:
Item* pItem = ObjectFactory::Spawn(Item::Type, "weapons/sword_of_awesomesauce");
if (pItem && pItem->IsA(Weapon::Type))
{
// Successfully spawned and is actually a Weapon.
}
In other words, there is very little code that needs to be written to add a new game object type.

Conclusion
Programmers should consider their Philosophy of Code. I believe that focusing on Developer Efficiency in a business setting makes the most sense given the deadlines, the complexity of the tasks at hand, and the goal to make a profit.

23 March 2011

Debugging information cannot be found? No Problem!

In my last post, I discussed the frustrations of Visual Studio 2005 (and later versions) not being able to locate debugging information, even though it was present and fully usable by other tools.

I believe I have discovered a workaround that works nearly all the time: Remote Debugging.

It turns out that running the Remote Debugging Monitor on the same machine and setting up the project to use Remote Debugging seems to work around whatever issue Visual Studio is experiencing.

Remote Debugging is really useful if another machine is experiencing a problem that you can't reproduce locally. The Remote Debugging Monitor is primarily intended to run on a different machine than Visual Studio, but can also run on the same machine.

Here is how to set up Remote Debugging:
  1. Generally, the machine running the Remote Debugging Monitor will need the files. These are found under the Visual Studio install location: C:\Program Files (x86)\Microsoft Visual Studio 8\Common7\IDE\Remote Debugger\x86 (for 32-bit) or C:\Program Files\Microsoft Visual Studio 8\Common7\IDE\Remote Debugger\x64 (for 64-bit).
  2. Copy the files from the above directory to the machine that will run the Remote Debugging Monitor (skip if you are running the Monitor locally).
  3. To start the Remote Debugging Monitor, run msvsmon.exe. If you are running locally, there should be shortcuts in the start menu:
  4. Configure the options if necessary. Take note of 'Server name'.

  5. Configure your project to do Remote Debugging. Change the 'Debugger to launch' to 'Remote Windows Debugger'. The 'Remote Server Name' must match the 'Server name' configured above if using Windows Authentication. If you are running the Monitor on a remote machine, the Remote Command and Working Directory will be paths on the remote machine.
When you Start Debugging, Step Into or Step Over to start debugging the application, Visual Studio will now connect to the Remote Debugging Monitor. You should be able to verify this by looking at the Remote Debugging Monitor and seeing how many connections it has.

So far this appears (for me at least) to be a successful work around to the 'Debugging information for 'X.exe' cannot be found or does not match. No symbols loaded.' error message. There have only been about two times in the past month where a problem occurred. In those cases, a restart of Visual Studio (and killing mspdbsrv.exe) fixed it.

Please let me know if this worked for you!

03 February 2011

The (current) Bane of my Existence


Yes, Microsoft Visual Studio 2005, I'm looking at you.

Whenever I try to run the Clone Wars Adventures AdminClient in the debugger, I have about an 80% chance of seeing this:

This is a debug build. I most assuredly have debug symbols turned on:
And I'm not the only one to ever have this problem. People have also reported this problem on VS2008.

Oddly enough, no one else on my team has been complaining about this problem. When I start VS2005, I can generally run the client in debug once or twice and then I perpetually get this error.

Sometimes, exiting VS2005 and killing mspdbsrv.exe followed by a restart of VS2005 usually allows me to run a couple more times. However, with our huge solution (112 projects), this takes a few minutes or so. Definitely not conducive to small changes.

Some of the links above have responses from MS folks who state that they aren't able to reproduce the problem, but there is most definitely a problem.

I've only experienced this problem on our internal AdminClient, which, unfortunately, is the project that I'm most often trying to run. Other projects in the solution file seem to work just fine. I've tried several suggestions from the above links, including others like replacing dbghelp.dll with the latest version, altering the symbol search paths, trying to manually load symbols, and so on.

As a last-ditch effort, some of the links above suggest re-installing VS2005. I'll give that a shot.

If that doesn't work, I may have to become a Pirate or something.

Update: (3/23/2011): I believe I have found a work-around by using the Remote Debugging Monitor. More info in this post.

15 September 2010

Ladies and Gentlemen, we are LIVE!


(Read the title in your best Bruce Buffer voice).

My new game, Clone Wars Adventures, is now LIVE and out of Beta! It's free to play and easy to download so head on over to the website and check it out!

27 August 2010

Open Beta!


My new game, Clone Wars Adventures, is now in Open Beta! Head on over, create an account and let us know what you think on the forums (must sign in with your Station name)!

01 June 2010

Finally!

We just announced the new game that I'm working on. Finally I can talk about it!

So, without further ado:


This is a new online free-to-play PC game targeted to kids (and adults) due out this fall. It is built upon the technology first developed for Free Realms. It will be largely mini-game based allowing things from Lightsaber Dueling to Speederbike Racing, the obligatory Starfighter missions and even a 3D tower defense game called Republic Defender. However, there is still a large social aspect with friends, housing, leaderboards and even a kid-friendly Facebook-inspired profile page.

On a personal note, this is a great project to be on. I am a huge Star Wars geek (over 15,000 LEGO bricks in my office representing different Star Wars ships) and my son loves Star Wars and the Clone Wars (and, incidentally, this game too!).

I hope you enjoy the teaser site and video. I look forward to actually being able to show in-game demos (*ahem* E3 *cough*)!

Update 6/1/2010 1:47PM PST:

15 April 2010

/resurrect iPhone

I broke my iPhone 3G. Again.

A few months ago I dropped it in the supermarket. It landed flat on the screen and when I picked it up I was horrified to discover a spiderweb-shaped crack in the screen. Fortunately, everything still worked. For $70 I had it repaired at Volt Mobile. They did pretty good work, but the touchscreen was intermittent (I'd have to flex the phone to make it work again).

Last week, I dropped it again. This time the touchscreen was completely broken--I couldn't even turn the phone off or enter my passcode to do a backup.


This time, I figured I'd try my own repair. Hey, it's worked in the past.

A quick look online shows several places that sell digitizers (touchpads), LCD screens, batteries, you name it. I ended up going with a digitizer sold from AccessoryOne (which purports to be OEM) for less than $20 shipped and taxed. There is also a three-part video series on cracking open the iPhone and swapping out the digitizer. The videos are made by http://www.directfix.com/ who also have parts but tend to charge a bit more.

This blog basically chronicles my repair. If you're doing this yourself, watch the videos; they're much more informative. Also, there is no guarantee that this will work, and it will void your warranty (mine has already expired). I just figured that I'll be upgrading to the 4th-generation iPhone when it comes out anyways.

The first step was pulling out the screen assembly. Two screws from the base (near the speakers) are all that is holding the screen assembly on. Unlike the videos, I used a suction cup on the screen near the home button to pull the screen out. I believe this works better and doesn't molest the rubber seal around the screen assembly. This picture shows the screen assembly removed from the base:


This picture shows the new digitizer/glass on the left top, the removed LCD screen on the left bottom and the old frame/digitizer assembly on the right bottom:


Removing the LCD screen is tricky and must be done carefully. I've read posts from people who crack their LCD screens at this step and it's a much more expensive component. I was very gentle.

The digitizer that I ordered was just the glass/digitizer combo; it didn't include the screen frame or the components that are mounted to it (speaker, skin sensor, home button, etc). Therefore, the frame must be removed from the original glass/digitizer and attached to the new one. This was probably the most tricky part. It involves using a hair dryer to weaken the glue and pry the frame off. Then new two-sided tape must be applied to the frame and attached to the new glass/digitizer.

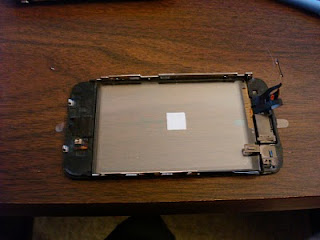
This picture shows the removed frame (bottom center) and the old cracked digitizer on the bottom right:


After a few minutes of work, the frame was attached to the new glass/digitizer:


The new glass had an appropriate amount of protective film, so it was fairly easy to minimize dust getting in between the screen and the glass. The new screen assembly with LCD installed is now shown on the bottom:


After getting the screen cables connected I powered on the phone and was able to enter my passcode to unlock the phone (note that the protective film is still on the screen, hence the sticker in the middle of the screen):


Yay! All-in-all, a very successful repair for under $20 and about an hour.

Now... to find a better case...