Maybe I'm getting old, but for about a decade I've preferred to watch shows with captions. There are basically three types of captions present on DVD and BD media:
- Closed Captions - text-based captions that may include hard-of-hearing information.
- Bitmap Captions - bitmaps that are overlaid on the screen.
- Forced Bitmap Captions - technically a subset of (2). Typically shown for foreign languages.
Bitmap Captions allow the DVD/BD publisher to ensure that captions look the same on every player, whereas text-based Closed Captions can look and perform differently on different players, TVs, etc. And in my experience, Bitmap Captions don't display on the Apple TV whereas Closed Captions will. Also of note is that DVD and BD each use a separate type of Bitmap Captions--VobSub for DVD and PGS for BD.
Now, if Bitmap Captions don't show on the Apple TV, why do I care about them? There are two main reasons: 1). If Closed Captions don't exist and 2). Forced Subtitles.
At this point I should mention that I'm using Handbrake to encode my movies for the Apple TV. Several pages exist as guides to using Handbrake, so I'm not going to cover it in much detail, except for dealing with captions.
If Closed Captions Don't Exist
If a DVD has Bitmap Captions (VobSub) but no Closed Caption, then we need to find a way to add text-based Closed Captions. Fortunately, there are a few options.
The first option is my least favorite. Handbrake has the ability to burn-in Bitmap Captions. This means that captions will be present, but there will be no way to turn them off. For all captions, that's not desirable, but as seen below it can be quite handy for Forced Captions.

The second option is to find a SubRipper (SRT) file that someone has created. Fortunately there are some great crowd-sourced resources for this, like Open Subtitles and my personal favorite, SubScene. These sites allow you to search for a SRT file that someone has created and uploaded. Handbrake can import the SRT file by using the Import SRT button (seen in the picture above). The downside to this method is that timing is everything. There can be Special Editions and Director's Cut versions of the movie you're searching for, so ensuring that you have the correct file will involve using Handbrake's Preview feature or using a player (like VLC Media Player) to preview before encoding. Otherwise you could end up with captions that don't match.
The final option is to create your own SRT file from the Bitmap Caption. This can either be done manually (VERY time consuming) or with the aid of OCR software. This was more of a last resort for me, but I did do it for a few of my DVDs. I used a program called Subresync. It is about as naive as OCR software can be, essentially asking the user the first time it encounters a specific pixel pattern:

Forced Captions
This is where things get a bit trickier. Forced captions were typically not a problem for DVDs as all of my DVDs that used Forced Captions actually had them burned in to the video stream. Not so for my BDs. A good example is Star Trek VI: The Undiscovered Country where the Klingon speech is a Forced Caption track and is not burned in to the video stream. And Forced Captions are something that everyone should want as they are essentially part of the movie.
Also complicating this process is the fact that Handbrake does not yet understand PGS-style Bitmap Captions (the system used for BDs). Therefore, the PGS (or 'Sup') Captions must be converted to VobSub before using Handbrake. This involves the following steps:
- I use MakeMKV to get the BD data on the hard disk in MKV format.
- Load the .mkv file in the mkvmerge tool from MKVToolNix. This will tell you which tracks contain PGS Caption data:

In this example, IDs 2, 3, 4 and 5 contain PGS subtitle data. Leave this program open as we'll come back to it if we do indeed find Forced Captions. - Extract the subtitle data using mkvextract on the command line:
mkvextract tracks Star_Trek_VI...mkv 2:sub2.sup 3:sub3.sup 4:sub4.sup 5:sub5.sup
This will extract tracks 2-5 into files sub2.sup, sub3.sup, sub4.sup and sub5.sup - Open each extracted PGS Subtitle file using BDSup2Sub to see if it contains Forced Captions. In the Star Trek 6 example, we find that track 3 contains nothing but Forced Captions:

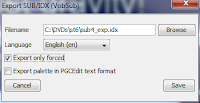
- Since we've found Forced Captions, we need to convert them to a format that Handbrake understands. Fortunately, this is what BDSup2Sub was designed to do. File->Export gives the following dialog (make sure that 'Export only forced' is checked):
Interestingly, VobSub is made up of a .idx text file and a .sub binary file. - Now we need to add the newly created VobSub captions and re-mux into a new .mkv file. Go back to the mkvmerge that was open from step 2. Click the Add button and select the new .idx file that was created in step 5, then press Start Muxing:

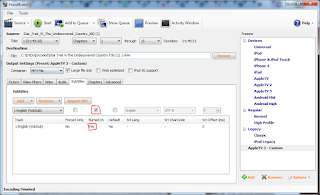
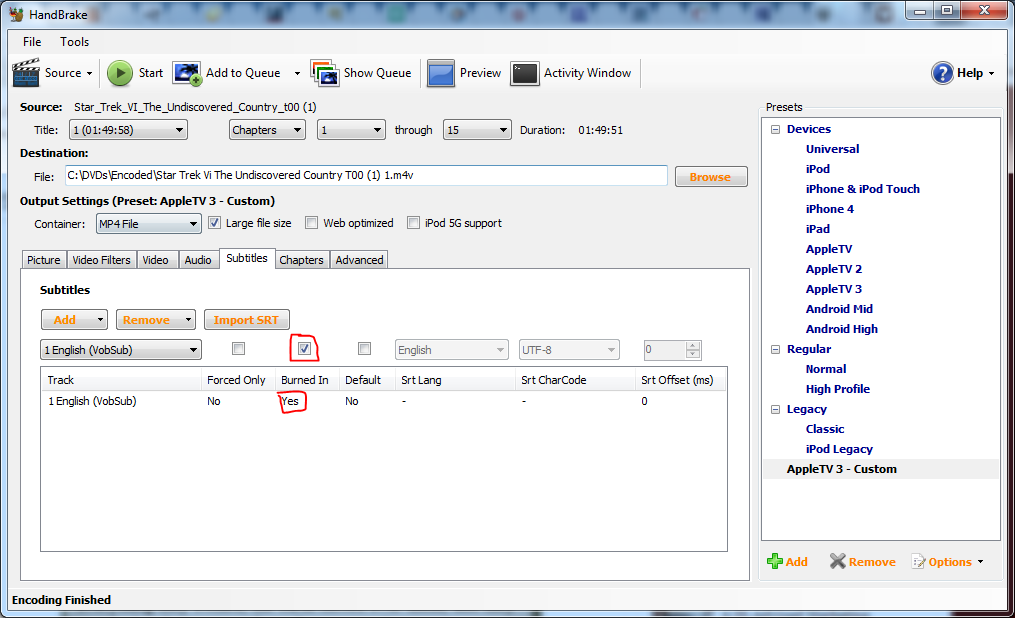
- When the muxing finishes, you can now load the new .mkv file up in Handbrake and burn-in the Forced Captions:


Getting captions to work correctly on the Apple TV with custom-encoded movies can be a bit tricky, but if you're hard-of-hearing or just used to using captions, hopefully this guide can help you.